Archives for posts with tag: Remodel

You know how some people say, “I fall in love with every dog I see”? Well, I’m starting to think that I fall in love with every piece of wood furniture I see.

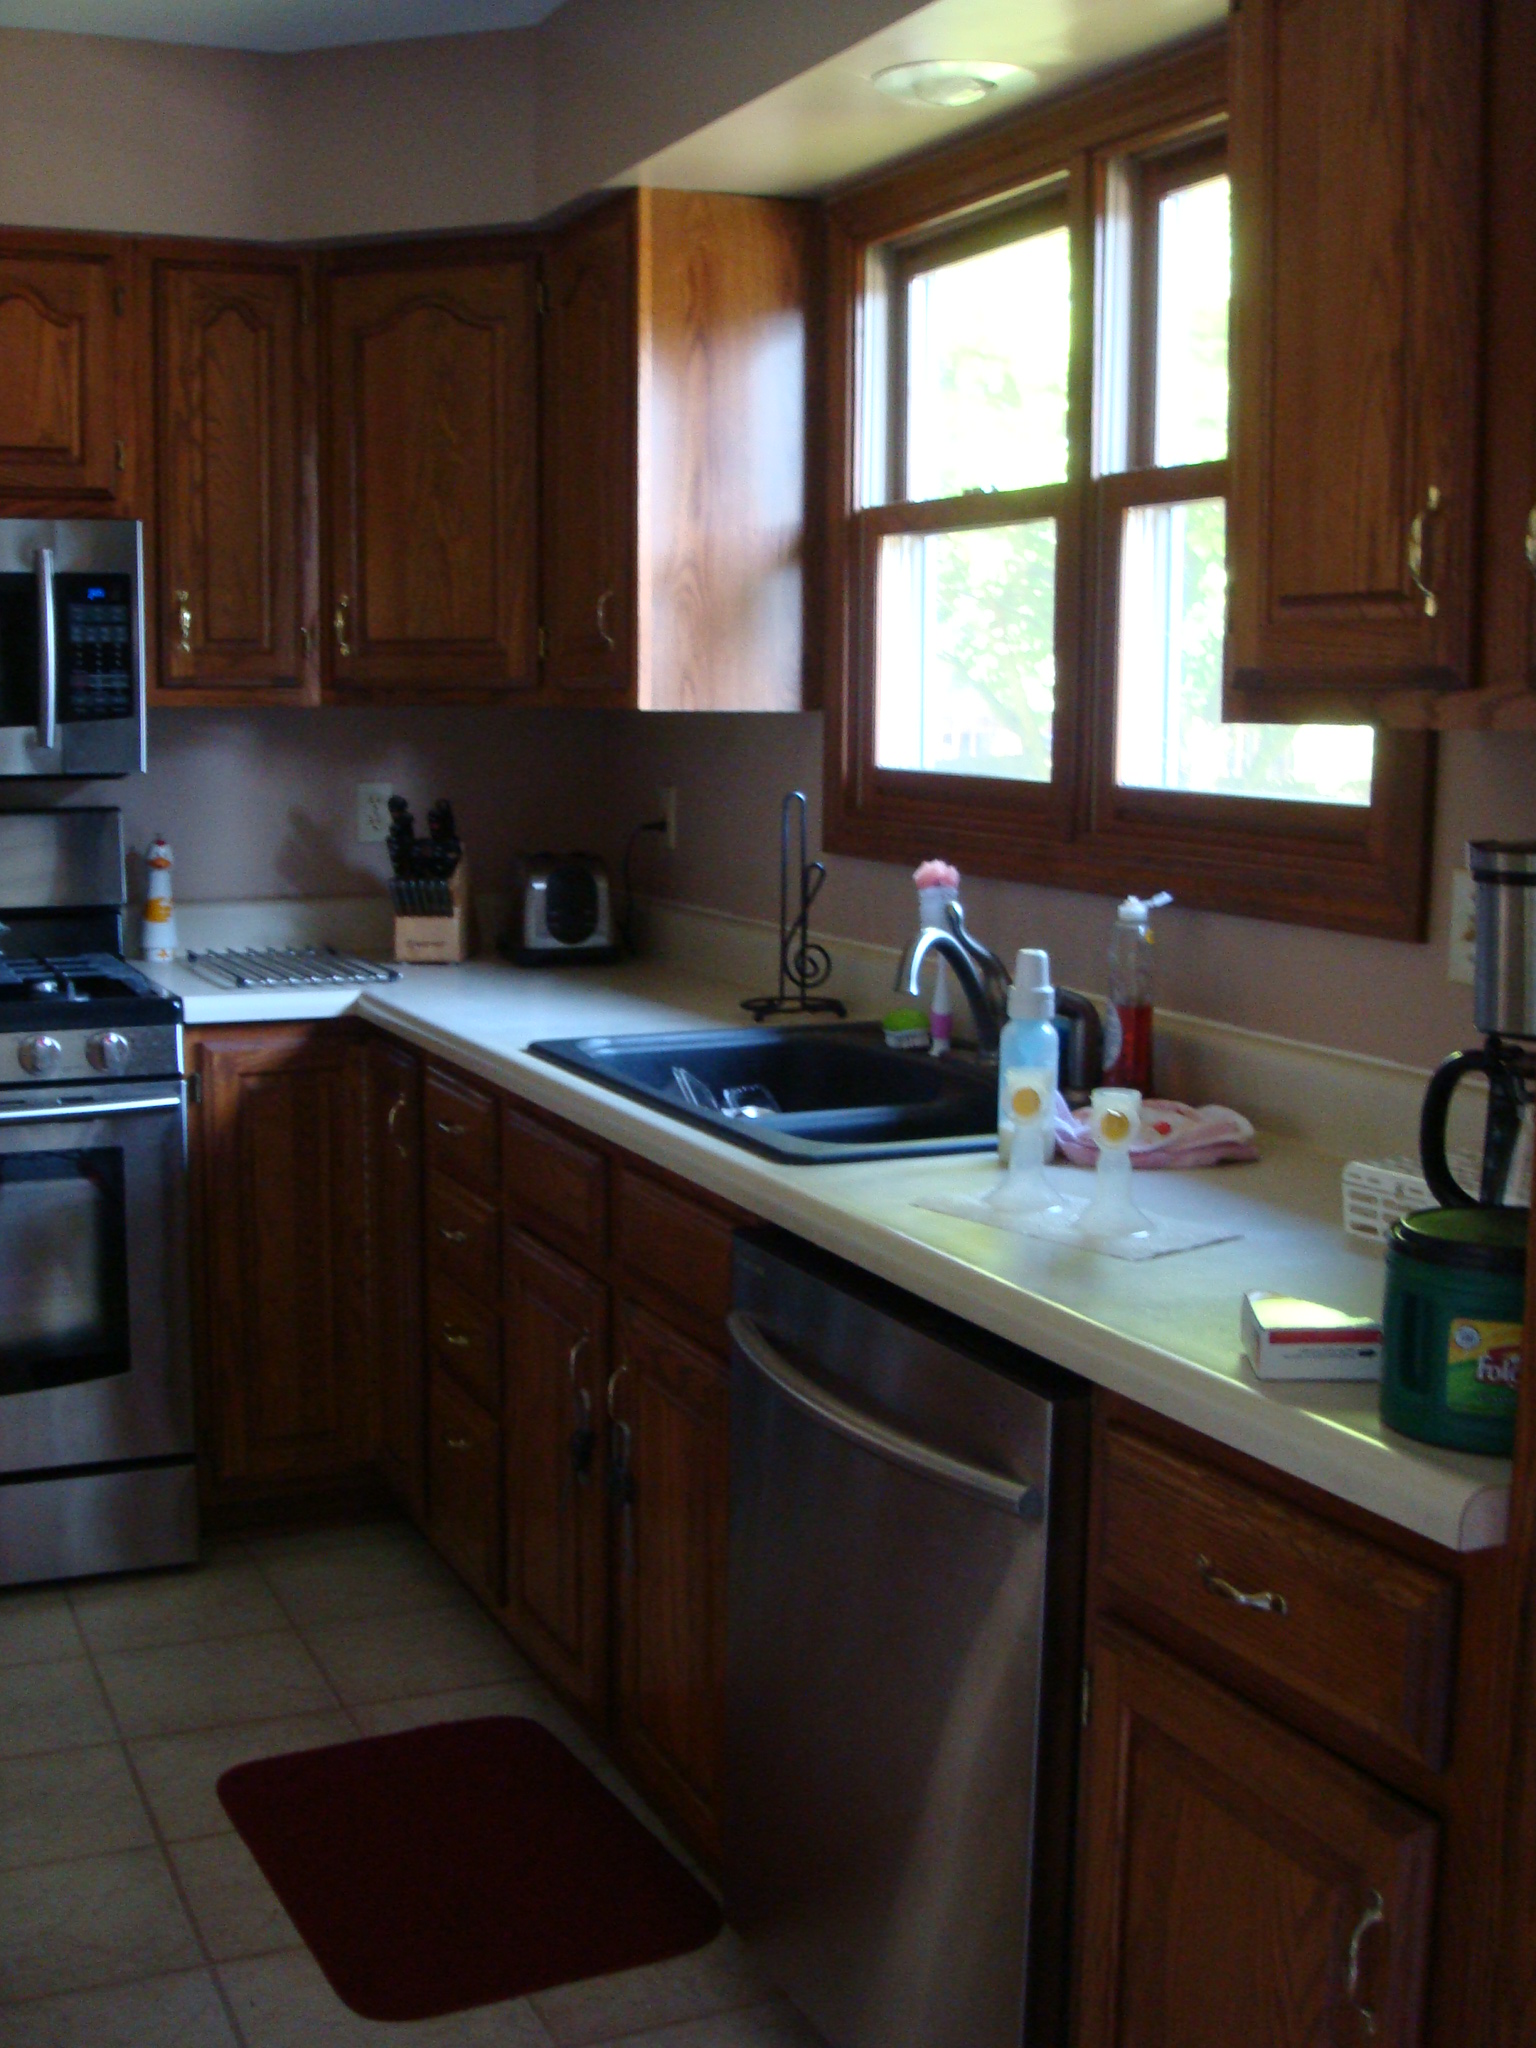
Apparently, it is a springtime tradition for me now to refurbish and restore an old piece of furniture. Three years ago, it was my 1930s typewriter desk. Last spring, I sanded and refinished my new-to-me teak patio furniture. Now, I’m working on resurrecting a dark, nine-drawer dresser with faux-wood drawer fronts and large, heavy brass handles.

IMG_20190305_153705825

14 days ago, on a whim, I logged onto Craigslist, and when I clicked “furniture,” my jaw dropped. The very first entry on the local page was this dresser. The pictures were terrible. The description was downright inaccurate (it was listed “excellent condition,” even though the pictures clearly showed water stains, dents, and scratches). The owners were vague and almost impossible to contact (pro tip for any future Craigslist posters: don’t write “text only,” and then respond at the rate of one text every 8 hours). But I couldn’t stop coming back to this dresser. I loved it. The shape, the size, the storage, yes. But mostly, the style. It was bold. Almost audacious. It was a true statement piece. It screamed the ’70s.

I was in love.

When we traveled in an early March snow storm to pick it up, I nearly backed out. While the owner had texted me “Solid wood,” my heart fell to the floor when I saw it in person and realized that the drawer fronts—those gorgeous, deep, intricate fronts—were made of (gulp) plastic. The plastic had been formed with phony wood grain, and painted a dark brown with black speckles. It was fake. It was dirty. It was damaged. It was heavy.

But.

I offered the guy $60. My husband pulled me aside and told me to not be stupid. To walk away. To look for something else. “I have a feeling about it,” I told him. “I know it’s crazy. But I can do something with this. I know it.”

When we got it home, my husband went into a rant. It was vomit inducing. It was ugly. It was a piece of crap back when it was built, and it’s a bigger piece of crap now. I had paid the guy for a piece of furniture that was going to end up on the corner with a “FREE” sign taped to the front. “If you can do something with that,” he said as he walked out of the room, “I’ll really be impressed with your skills.”

I was wracked with doubts. A part of me knew he was right. What could I even do with this thing? It wasn’t worth it. It was never going to be worth all the work.

Dejected, I started researching furniture restoration. Specifically, 1970s furniture. Specifically, cheap, plastic furniture. I didn’t find much at all. Nobody was restoring these pieces. Everybody else knew that these old dressers weren’t worth it. I was the only one who didn’t see it.

IMG_20190307_161431167

Though I never found a guide for interpreting the serial numbers on the back of this piece, here’s what I’m pretty sure is happening here: “B” for bedroom. “DR.” for dresser. “79” is the year of manufacture. “Cadiz” is the name of the line. “Oak” is the material.

I pulled some of the drawers out of the dresser, and found a maker’s mark and date of manufacture. I found out that the dresser was built in 1979, part of Bassett Furniture’s “Cadiz” line of bedroom furniture. “Bassett.” My spirits sank even lower. Though they are all American made furniture, Bassett has always been known as a “budget” furniture maker. So. He was right. I had bought a 40-year-old piece of crap.

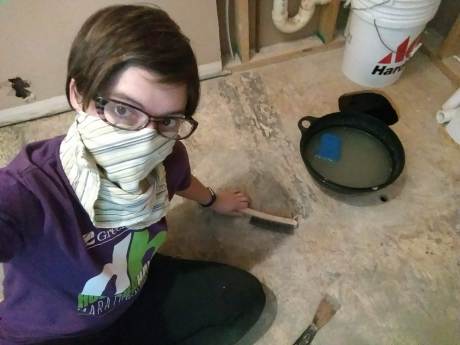
But I still loved it. And I couldn’t explain why. So, in spite of feeling like a complete sucker, I started to work on my drawers. I cleaned them all (so many disgusting Q-tips!). I fixed every loose joint. I glued and clamped one drawer which was cracking across the back. I filled the holes after removing the old hardware. Then, I started sanding the drawer sides. Unlike the plastic fronts and MDF backs, the drawer sides were solid oak. It was dirty and damaged, but it was straight, hard, clear American oak. I adore bringing old wood back to life, and I could feel my spirits lifting as I sanded and cleaned each drawer side, prepping them for polyurethane.

Suddenly, I noticed something. Only one drawer has the Bassett brand inside it. And I saw that the oak used for that specific drawer had the straightest grain, was the the clearest color, and was overall just the prettiest of the oak sides in the entire dresser. And I suddenly saw, with crystal clarity, a factory worker forty years ago in Virginia, assembling this dresser. They assemble hundreds of pieces of furniture, but as they put this one together, the select—with pride, with intention, with careful deliberation—the nicest drawer in the lot, and it is that one on which they choose to place the brand. They wanted to leave their mark—figuratively and literally—on something beautiful, something touched by their hands and sent out into the world for the consumption and enjoyment of others. This factory worker cared about their product. They cared about this piece. They put their sweat and their love into it. I could see. Burned into wood.

IMG_20190313_171543032

And I realized just how worthy this dresser is to be saved. To be restored. To be loved and respected and given a place of honor. Because if we only value the stark mid century lines of the highly photographed and known pieces, then it is only the stories of the exorbitantly wealthy owners of Case Houses which will be shared through the narrative of our homes. If only pale grey walls can be considered sophisticated by certain tall, handsome brothers, then we risk losing the opportunity to turn our homes into an expression of our individualities for fear of disappointing urban, wealthy trendsetters. If we throw up architecturally inaccurate ship-lap on our walls in the name of style, we are replacing the narrative of our homes with one that has been fed to us through a hazy filter of produced nostalgia without backstory. Just because a piece was affordable, does not mean that it does not have a story that is worth telling, worth hearing, worth preserving. Giving this dresser a new life, and a place of honor, will preserve a history that is also worth hearing. One that is decidedly middle American. Lower middle class. Probably rooted in first time home ownership. One that looks at a fantasy world across the sea (“Cadiz,” the line was called. On the Spanish Mediterranean. It might as well be floating on one of Saturn’s rings for a late-seventies homeowner on the Rust Belt.) It is perhaps kitsch. Perhaps a bit disco. Perhaps a bit stylistically misguided. But it has value.

And, dammit. I love it.

One of the things that sold us on our current home when we took our first tour of it almost six years ago was the downstairs full bath and guest bedroom. My mother doesn’t navigate stairs well, and we knew that, as she was rapidly approaching retirement, long grandparent visits would be in our very near future. A downstairs suite was ideal for us and our extended family. But the “full bath” that excited us so much in theory was small, dark, tight, and depressingly pink and flowered in reality. Even a petite woman like me couldn’t wash my hair in the afterthought of a shower stall without smacking my elbows against the walls every time I raised my arms. After finishing our kitchen remodel three and a half years ago, we knew that our next big project would have to be the bathroom. Starting on Labor Day Weekend this year, and finishing on my birthday, November 17th, here is our entire renovation, from beginning to end. In pictures. (Because that’s what everyone wants to see anyway, right?)

BEFORE: A pink, brown, and gold disaster

IMG_20180830_102458563

IMG_20180830_102522534

IMG_20180830_102609268

IMG_20180830_102617253

IMG_20180830_110709348

IMG_20180831_095526609

Our budget: Two years’ worth of garage sales, plus birthday and Christmas money. My underwear drawer was RICH for, like, 6 months!

THE BEGINNING: Demolition, Labor Day Weekend 2018

IMG_20180902_113519274

IMG_20180902_123956862

IMG_20180902_132348394

IMG_20180902_132402995

IMG_20180903_174759979

CLEANING, PLUMBING, AND ELECTRICAL: September 3-17th

IMG_20180904_133307687

IMG_20180908_150000617

IMG_20180908_153212215

Note to Self: Don’t turn the water back on until you are CERTAIN that all of your pipes have caps! (Just a mini-flood.)

IMG_20180909_100112_936

IMG_20180910_104755218

FINDING THE FINISHES

IMG_20180903_093015120

Our very first tile-shopping trip, and we fell in love with geometrics.

IMG_20180911_181013328

IMG_20180903_132040079

Stuck in the Longest. Ikea line. Ever.

IMG_20180905_190351533

IMG_20181106_071545581

IMG_20181106_071633914

IMG_20181106_071700576

IMG_20180915_140356103

IMG_20180915_162227957

IMG_20180916_095137980

Recessed lighting! New fan! Drywall!

PAUSE: My husband had to have kidney stone surgery on September 18th. He had to have multiple procedures, and the bathroom was on hold until October 14th.

IMG_20180918_101315638

BACK AT IT! Tile for DAYZ.

IMG_20181014_141219932

IMG_20181014_164151367

IMG_20181028_181042_696

IMG_20181103_105200386

IMG_20181104_182227330

IMG_20181104_182240019

IMG_20181105_172640628

IMG_20181105_174943712_HDR

IMG_20181109_005610791

IMG_20181111_114320945

IMG_20181111_121628394

IMG_20181111_142216300

IMG_20181111_170322106

FINISHING: After all of that work, installing the glass shower walls, the vanity, light, and toilet took only a long afternoon. Suddenly, the bathroom was done. We have just a few more days to wait for the grout to cure, then we get to shower in the new, gorgeous, downstairs bathroom! I need to buy new towels, because, frankly, my old towels are just too unimpressive to place in here!

IMG_20181124_113654298IMG_20181124_113713251IMG_20181124_113811891IMG_20181124_113826453IMG_20181124_113843359IMG_20181124_114031166_BURST000_COVER_TOPIMG_20181124_114107345_BURST000_COVER_TOPIMG_20181124_114114235_BURST000_COVER_TOPIMG_20181124_114121690_BURST000_COVER_TOP

Once Honest Husband and I finally decided to dive head-first into a kitchen remodel, the question of what to do with the cabinets was (understandably) the very first concern we needed to address.  We wanted the remodel to be significant enough that we wouldn’t feel compelled to do it all over again after ten years, but we needed to stay within a pretty modest budget (right around $6,000—$5,000 for the cabinets, and $1,000 for the flooring. We’ve managed to stay pretty close to that budget. More on that later.).  All of the labor and work would be done by my husband, with me providing modest backup support (we’ve been really lucky and had lots of babysitting by my mother-in-law during this project, so I’ve had several days where I was free to actually help—sweep, vacuum, make food runs, supply paper towels, hold tape measures, give feedback), and it had to be work that could be completed either on the weekends, or in that glorious hour in between when our girls went to bed and when we did.

Knowing that my favorite style of kitchen cabinetry is a simple Shaker, Honest Husband (who is in love with his router, and seriously tried for months to talk me into a more complex design, I think just so that he could use it more. To be fair, it is a pretty sweet tool) at first suggested painting out all of the cabinet boxes, then building new doors for all of the cabinets.  He figured the doors would be a project that he could tackle himself, with the help of his dad’s old table saw (having a mechanic/contractor for a father-in-law is a really big advantage) and some relatively cheap (but still better than builder grade) lumber.

But then I told him that I’d really like the old pantry to be removed and the entire kitchen opened up to the family/play room.

The pantry obscured my view from the kitchen to the playroom when I stood at the sink.

The pantry obscured my view from the kitchen to the playroom when I stood at the sink.

And the cabinet box under the sink needed some serious rebuilding after we discovered old water damage (and a little bit of mold. Again, more on that later.).

Also, the (empty) cabinet above the microwave needed to come down to make room for the new range hood.

That awful microwave. It was only 9" above the cooktop!

That awful microwave. It was only 9″ above the cooktop!

And the sink that we both fell in love with (an Ikea farmhouse/apron front sink. The only one we found that had the attached drip rail in the back where I could set sponges and soap—a major advantage for finding cheap countertops, too. Without the necessity for a large hole cut into a single piece of countertop, the square footage needed for the kitchen countertop was cut way down) was 36” wide, not 33”.

ikea domsjo sink 045

Image Credit

And, well, so long as we’re talking about what we’d ideally like to see, there’s the issue of that soffit . . .

DSC06041

“You’re never going to be fully happy with this kitchen until that soffit comes down, are you?”

“Well,” I was willing to be flexible.  I was at least willing to look like I was flexible.  “I just don’t know.  I’ve heard horror stories of people who tried to take down their soffits and wound up needing to do some major work because it turned out that all of their plumbing went through there.  So maybe we just don’t even want to touch it.  And, I mean, I’ve seen some soffits that are painted beautiful colors and designed to go with the cabinets that have been installed.  My cousin just remodeled her kitchen a few years ago, and they kept their soffit. You barely even notice it because everything else is so great.”

He looked over his glasses at me. “Rachel.”

“No, no, no. We can work with it.”

“Rachel . . .”

“Okay! Okay. I hate it and always will.”

He sighed. “I guess I’ll just have to build you some new upper cabinets then, huh?”

That was when I started to suggest Ikea cabinets for the whole kitchen.

My husband immediately balked.  “No. I don’t like them. They’re frameless. It looks cheap.”

“Really?  I think it looks really modern and clean.  And they don’t have any stiles or rails in the middle of their big cabinets. I’d be able to put everything in there. Now I have to wiggle and force it all.”

“It’s cheap. It covers up the boxes because the boxes are just MDF. Having some space between the doors shows off the real wood. I don’t want this to look cheap.”

“You just want it to be cheap.”

“Exactly. Besides,” he said, “I’ll be able to do this cheaper on my own.”

So, we started researching all of the different cabinet styles and options that we found and liked.  We wandered through the kitchen sections at big box stores, snapping photos and grabbing cabinet samples that we liked. He leaned towards a more traditional, raised panel design, worried that my simple Shaker style would look too clean, too plain. We compromised after finding these cabinets on display at our local Lowe’s.  They were Shaker with a twist. An extra detail of routing around the inside frame. Shaker and stirred. It was perfect.

KraftMaid Sonata cabinets, available at Lowe's.

KraftMaid Sonata cabinets, available at Lowe’s.

“Take a ton of pictures! Like, a ton!”

But I was still unconvinced that having my husband build the cabinets was really the best solution.  Please know, I wasn’t in any way hesitant about his abilities, or about the quality of work that he would generate.  I knew anything that he built would be incredibly durable, overbuilt, even.  I knew that it would be measured precisely, and give the whole room a custom look, fit, and feel.

But I also knew that I didn’t want to live with him while he was building these cabinets.

I know the level of perfectionism and obsession that my husband possesses. I knew that every not-entirely-square corner of the kitchen walls will be discovered and thoroughly cursed.  I knew that he would break out his calipers in order to build cabinets with indistinguishable uniformity.  I knew that he would spend hours in the garage, leaving me to watch the girls while they scream for daddy, and telling them that they just can’t help daddy right now because he’s working with nails and glue and saws and heavy lumber and all kinds of dangerous things.

I knew that I’d start to resent him. Even while he was working to give me this incredible gift.

So I kept saying it, “Ikea.” I pointed out every kitchen I saw on the television (most of them are made with Ikea cabinets. Just about every advertisement that is filmed in a kitchen is filmed in front of Ikea cabinets. Also, even high end remodeling shows like “Property Brothers” use Ikea cabinets).  I looked up pictures on Houzz.  I found every DIY, lifestyle, remodeling blog I could find.  I slipped the suggestion into every conversation we had about the kitchen. “Ikea.” He started reading a few of the testimonials I had talked about. He looked through Ikea Hackers, and Ikea Fans.  He read articles on how Ikea constructs their cabinets.  Suddenly, he started talking to me about how the construction of the boxes for Ikea is the same as for the big box stores, as for custom cabinetry.  He started to research hardware, and found that the hardware Ikea uses is considered some of the best around. Especially for the price.  He started to think about ordering doors from some of the companies that specialize in replacement doors for Ikea cabinets.  But after pricing those out, we started to look at the options available from Ikea itself.

“I’m coming around to Ikea cabinets. Really, I am.”

Finally, we took a day trip over to our closest Ikea (about a two and a half hour drive away). When we saw the Ramsjo cabinets in white, it was all over:

Shaker, and stirred.

IMG_20140323_143436260 IMG_20140323_143429586

In the car that day, my husband concluded, “They’re not the best looking.  They’re not the cheapest.  They’re not the highest quality.  But they do seem to have a really good balance of all three.”

I had him.

It had taken months of convincing, cajoling, arguing, suggesting, needling, guiding. But I had him.

Now all we had to do was design the damn thing.

The Year of the Kitchen

Honest Dad and I moved into our home about a year ago. I love my new house. It’s spacious. It’s quiet.  It’s comfortable.  It’s not too big, nor too small.  Not too open, nor too closed.  And my father-in-law found it for us! True story. Honest Dad and I were starting to kick around the idea of moving back to his hometown, when out of the blue, my father-in-law called us. “I found your house!”

“Was it missing?”

He had been talking about the prospect of us moving back to town with a friend of his who is a realtor, and she told him about this property. He said that it sounded perfect. Skeptical (and still not entirely sure we were ready to make the big move across state lines), we came over for the weekend, “just to look.” It was the first home we had ever toured together (my husband had purchased our first home fresh out of college), and what can I say? The old man was right. It was our house.

Located in a premium school district, along a cul-de-sac, the house is a South-facing brick front home built with a nod towards a classic “four square” design. It has four bedrooms on the top floor, one on each of the four corners. Each bedroom is separated from the other by either a closet or bathroom, so even with two small children, all of the bedrooms are quiet and peaceful.  But, because it also has an attached garage, it has a large bonus room above the garage and a large family room behind it, open to the kitchen.  It had a fenced-in backyard with room for a swingset, and a deck that stayed cool and shaded in the summer.  It was perfect.

The classic Four Square home.

The classic Four Square home.

After that first tour, my husband asked me to rate it on a scale of 1-10.

“8.5.”

“Where does it lose points?”

“The kitchen. But not because of function. It’s aesthetics. I’d say that, compared to the kitchen we have now, this kitchen is a lateral move. Everything else is a move up.”

It really was. The kitchen in our current house is very functional.  It has a small island, a great work triangle, good prep space, and plenty of cabinets (at least for my purposes. We do have a large buffet in our dining room that houses all of the bigger serving platters that usually only make an appearance around Thanksgiving and Christmas. But even that isn’t packed full. If push came to shove, I could certainly store all of my kitchen accoutrement in the actual, physical kitchen).  But it was clearly getting a little dated.  Built in 1992, it is a shrine to the dark, heavy oak and brass fixtures that were considered the height of sophistication at that time.  Honest Dad and I have an aesthetics of mid-century modern with a splash of old-school.  He loves large, shiny, clean black surfaces, and I love to dress them up with bright, patterned fabrics. We prefer grey and white to beige.  I think that certain shades of purple and blue can be considered “neutral.” Ikea has had a hand in the furnishing of every single room in our house. Dark oak, cathedral style cabinets with beige laminate countertops just ain’t our thing.

But it worked. It had a breakfast nook, and opened up into a sunken family room with a large, brick fireplace and 16-foot ceilings. The girls could play in that room while I cooked, enjoying the brand new, state-of-the-art stainless steel appliances, while Honest Dad and I saved up for the eventual inevitability of a fix-up/remodel.  And when we moved in, that was our plan. Live with the dark kitchen for now, and in a decade or so, as the girls grow, look into remodeling.

But we weren’t in the house very long before some very real concerns arose in the kitchen. The first thing that I noticed was that the countertops felt sticky.  All the time. No matter what I did.  No matter what cleaners I used. Sticky. Or at least, tacky. All over. I told Honest Dad about it. We scrubbed.  He brought back industrial strength cleaners from work (he works in aviation, so these cleaners are designed for some serious grime!).  I coughed and wheezed from the fumes, and worried about Honest Baby, swimming around in my womb and absorbing all of these horrific chemicals. Nothing worked. Tacky. Sticky.

And stained. For some reason, these countertops would stain within seconds. Red wine.  Fruit juice. Indian takeout. If any sauce or fluid dripped on the counter and sat for longer than 30 seconds or so, I had a new stain to add to my growing collection. I once set a bag of tortillas down on my island while putting groceries away, and when I picked the bag back up, there was a perfect mirror-image of the label. Emblazoned across my kitchen island.

Desperate, we started scraping and polishing. We scraped the entire top layer of laminate off.  The top layer of laminate was destroyed.  Melted, for all we could tell, probably by some kind of harsh cleaning product not intended to be used with laminates. Suddenly, my functional-yet-dated kitchen was depressing. As a stay-at-home mother, I spend about 80% of my time in my kitchen, and these countertops were making my time much more difficult and distracting than it needed to be. And potentially dangerous. Without the protective coating on the top of what is essentially pressed paper, I can only imagine the bacteria and diseases that are now setting up shop on my countertops. How could I keep Honest Girl safe while we baked brownies?  What about when Honest Baby starts eating solids? Every time I slice chicken or crack an egg, I just think about the horrors that are slowly seeping into my family’s space.

Then, there was the microwave. The old owners, in an attempt to make the house more appealing in a difficult housing market, had purchased an entire suite of beautiful stainless steel appliances. Including an over-the-range microwave with a built-in vent. But, in order to save money, the owners didn’t replace the upper cabinet on top of the microwave. So it was low. Very low. I only have about 11 inches of clearance between my stovetop and the bottom of my microwave. On one hand, that works great for me when I use the microwave. I’m only 5-foot tall, so if the microwave was six inches higher, I wouldn’t be able to even see inside it while trying to use it.  On the other hand, it means that cooking on the stove is a continuous challenge.  My tall stock pots fit, but not with a spoon and my hand.  Also, the bottom of the microwave gets splashed with grease and sauce no matter what I do. Finally, because it sits so low to the steam and heat of the cooking, the stainless steel has actually started peeling off the bottom of the microwave. Seriously.  There’s a little flap along the bottom of the buttons that has lost its ability to stay attached to the face of the microwave.  On a side note, I have to say that I have also always been less than impressed with the built-in ventilation capabilities of over-the-range microwaves. They’re just not powerful enough to actually move the smoke away fast enough.

Right off the bat, then, we realized that the countertops needed to be replaced. And the microwave. And a dedicated vent hood installed. Which would mean taking down some cabinets (that are not being used anyway). Just these two issues—countertops and the microwave/vent—made us realize that perhaps we didn’t have the luxury of the next 10 years to “just live with it.”

So, we started talking about what we could do to improve it. First, we said that we could just paint out the dark oak, replace the brass hardware, and replace the laminate.  These were all jobs we had done before in our kitchen at our old house.  But as we discussed our needs and wants for our kitchen in this new home, in this place that would see our children start and finish school, in this place that was no longer a “starter home,” but where we will be for the foreseeable future, things changed.  As we discussed budgets, time, DIY projects, and, of course, style, it became clear that just a refreshed kitchen wasn’t going to give us the kind of return on investment we were seeking.

Thus began the planning of our full, floor-to-ceiling kitchen remodel.

For months now, Honest Dad and I have discussed and researched cabinet boxes, cabinet doors, floor tile options, backsplash tiles, paint colors, layout, countertop options, drawer inserts, hardware, sinks. We went back and forth on every aspect at least three times. We discussed, agonized, scaled back, then charged forward again, only to creep backwards.  We created 3D models.  I placed sticky notes on my cabinets, trying to decide where the optimal locations would be for spices, plates, spoons.  Would the optimum set up be something highly functional and streamlined, or should I try to shove the maximum number of cabinets in?  What was the best balance?  For months now.  Just last week, Honest Dad and I sat down and ordered samples of high quality laminates (the biggest bang for our buck, in my opinion. Sturdy, durable, able to handle two young girls who love to “help,” and cheap enough that in 10 years, if we decide to rip them out and install a beautiful granite or quartz, we can).

How much have we been working on this?  The other day, I was going for a walk with my next door neighbor and good friend.  I was talking about the kitchen.

“We’ve made a command decision!”

She just looked at me. “You know you make a ‘command decision’ like every week, right?”

Oh. Right.

And now?

Our laminate samples! The official start to everything. The bottom center sample is the clear winner, in my mind.

Our laminate samples! The official start to everything. The bottom center sample is the clear winner, in my mind.

It. Has. Begun.

2014 will be the Year of the Kitchen. We are giving ourselves an entire year to complete this remodel (I think that’s reasonable for a complete DIY project of such magnitude). We have things organized into stages. First, we need to level the floor.  It has to happen before anything else can be done (There is a noticeable slope from the island to the dishwasher). Then, we will rip out the floor-to-ceiling pantry that’s currently blocking the gorgeous natural light from our 6-foot windows in the breakfast nook.  We’ll convert the closet in the adjacent laundry room into a walk-in pantry.

Then, the real construction begins.

The uppers will come down. Then the soffit. The ceilings will need to be repaired.  Plumbing, electrical, and ventilation all moved. Recessed lights installed throughout (right now, we only have one ceiling light for the entire kitchen).  Ikea cabinets purchased, arranged, and assembled.  Countertops built. Drywall repaired.  Cabinets installed. Backsplash. Paint. Electrical outlets. Grout. Sealers. Plumbing. Gas. Water. And a million other little things that I’m sure we’ll discover as we go along.

So don’t be surprised if this blog suddenly transforms into a mostly-DIY blog.  I will still be writing about kids, current events, pee and poop, to be sure.  But I’ll be doing it from a construction zone.  I’m sure that I’ll need to get on here and scream a few times throughout this process. Or cry. Or justify. Or explain. Or lament. And I’ll need some encouragement. And maybe even some advice. This won’t just be a terrifying adventure for me and my family, but for you as well, my online community. So, get ready.

The Year of the Kitchen is here.

A little inspiration. This kitchen is almost exactly our layout. They also used the Ikea Ramsjo (Shaker style) cabinets we selected.